Tuesday, November 25, 2014

Roasted Beet & Lentil Vegan Burger

Because I'm about to eat my weight in turkey this week I always try to healthy up until Wednesday night- then the holidays begin and I pretty much don't stop eating. Well I have food comas in between binging. What, no judgements?! I love food. 
So I decided to roast some beets and use up some leftover lentils I had to make a vegan (and gluten free) burger. And even though nothing compares to actual burgers in my mind- I really loved this sandwich!! It was filling and I still felt light after eating it aka the opposite of Thanksgiving full. 


Roasted Beet & Lentil Burger 

Fridge:
2 cups roasted beets*, cubed 
1 1/2 cups lentils, cooked
1 tbs italian parsley minced 

Counter:
Zest of 1/2 lemon 
Juice of 1/2 lemon (approx 1 1/2 tbs)

Pantry:
2 1/2 tbs flour (I used gluten free cup4cup flour) 
1/4 tsp ground cumin 
1/2 tsp salt
Few cracks of pepper 
1 tbs olive oil 

Optional: tomatoes, lettuce, avocado, burger buns

Tools:
Food processor or blender
Measuring cups/spoons 
Medium mixing bowl
Mixing spoon 
Nonstick sauté pan 
Spatula 
Paper towel lined plate 

Add roasted beets, lentils, lemon zest, lemon juice, minced parsley, cumin, salt and pepper to the food processor. Pulse until semi-smooth and well combined. 

Move into a bowl and add the flour- mix well with spoon. Once combined, use your hands to form 4 patties. I recommend using gloves if you don't want your hands to turn pink. 

Heat oil over medium heat in nonstick pan. Once hot- add your patties. I could only cook two at a time because of my pan size. Cook for 2-3 minutes per side. 

Remove from the pan and place on a paper towel lined plate to absorb excess oil. 

Serve your burger with whatever toppings you feel like. I kept mine vegan with avocado, lettuce and tomato but next time I would add some goat cheese. Enjoy!! Xo

*to roast your beets: wrap the beets individually in aluminum foil and place on baking tray. Roast at 375 degrees for 45 to an hour. The time depends on the size of the beets. Once a knife pierced through the foil easily- they're done. And then you can use the foil to help remove the peel. I sort of scrape the beet with the aluminum and then I don't have to deal with red dyed hands. 


Just after the food processor 


Monday, November 24, 2014

Turkey Prep Time

It's my favorite time of year! The holidays!! Woohoo! Thanksgiving is by far my favorite holiday- mostly because I get to cook for all the people I love but also because I get to stuff my face with deliciousness all day. Because I cook about seven to nine sides each year (anyone want to come over for leftovers??) I really have to use my time wisely before the big day. Today is the Monday before Thanksgiving and that means I brine my turkey and make my gravy. 

There are two different types of brines: wet or dry. Both add moisture and flavor to your turkey- so really it depends on what you prefer and do you have the fridge space for a wet brine. This year I do not have the fridge space and there I am doing a dry brine. It's very simple- mine took me about 5 minutes- and it really does up your turkey game. Give it a go! 


Dry Brine

Fridge:
16-20 lb thawed or fresh turkey 
1 tbs fresh or dried Rosemary, minced
1 tbs fresh or dried thyme, minced
1 tsp fresh or dried sage, minced 

Pantry:
1 tsp herbs de Provence 
1/4 cup coarse kosher salt
1 tbs brown sugar

Tools:
Small bowl
Spoon
Tray big enough to hold turkey and small enough to fit into your fridge. 

Mix all the ingredients in a bowl except the turkey. Combine well. 

Place turkey on your tray. Be sure to make sure it fits in your fridge and you have space ready to roll. 

Spread the brine all over the turkey- including the bottom and inside the cavity and under the skin. Put the turkey uncovered into the fridge. This can be done up to 3 days ahead of time. 

On turkey day you can cook your turkey any way you prefer. I usually cook mine for the first hour upside down and remaining 2 to 2 1/2 hours right side up. It usually takes about 3 to 3 1/2 hours to cook my 20 lb bird but I ALWAYS use a cooking thermometer. I remove the turkey once it hits 158 degrees and cover it and allow to rest for 45 minutes and it always comes up to 165 degrees- which is what you want with poultry. But first get to brining people!! Xo


Saturday, November 22, 2014

Apple Fritters with Maple Cinnamon Yogurt Sauce

Now we all know fried stuff is not the healthiest but sometimes the weekends are for letting loose and enjoying life, not counting calories. And I do admit- I have never counted calories- I think I would be scared if I did. My motto: everything in moderation but love. Cheesy but 100% true. 
These fritters are yummy and make a great addition to Sunday brunch. Plus the kids really loved them- so great for the whole family! 


Apple Fritters 

Fridge: 
1/2 cup milk
1 egg 

Counter:
3 1/4 cup apples, peeled and grated (I used two Granny Smith and two Roma apples)

Pantry:
1 1/2 cups ap flour 
1/4 cup white sugar plus 1/4 extra 
1/2 tsp salt
2 tsp baking powder
1 tsp baking soda 
1/2 tsp ground cinnamon 
1/4 tsp ground ginger
1/4 tsp ground nutmeg 
1/2 tsp pumpkin pie spice
1 tsp vanilla extract 
Enough canola oil to fill your pot 3 inches deep 

Maple Cinnamon Yogurt Sauce

Fridge:
1 1/2 cups greek or plain yogurt

Pantry:
1 1/2 tbs maple syrup 
1/4 tsp cinnamon 
1/2 tsp vanilla extract 

Tools:
Medium mixing bowl
Large mixing bowl
Wooden mixing spoon
Measuring cups spoons 
Medium high sided pot
Small bowl
Whisk or fork 
Box grater 
Tongs
Plate covered in paper towels 

Add your canola oil to your pot and begin to heat over medium to medium high heat. You can test if the oil is hot enough by placing the end of your wooden spoon in the center of the pot- if bubbles rapidly stream up the sides- it's ready. 

In the medium mixing bowl add 1/4 cup sugar, 1/2 tsp cinnamon, 1/4 tsp of numeg, 1/4 tsp of ginger and mix well. Then add your grated apples to the bowl and cover with your sugar spice mixture. Add the milk and egg to this and combine very well. 

In the large bowl add flour, baking powder, baking soda, salt, pumpkin pie spice and remaining 1/4 cup of sugar. Mix well and then pour your grated Apple mixture into this bowl. Combine and set aside until oil is ready to cook. 

Once oil is ready use an ice cream scoop or 1/4 cup measuring cup to scoop the batter into the oil. I could oil fry 4-5 at a time because my pot was smaller- do not overcrowd the pot because the temperature will drop and cause uneven cooking. 

Use your tongs to cook each side of the fritter- it should take a minute or two per side. Once a deep golden brown- remove from the oil and place on the paper towel lined plate. Contine cooking and allow the fritters to cool a few minutes before enjoying! 

To make the sauce: combine all the sauce ingredients in a bowl and mix. Enjoy it! Xo


Finished batter before cooking 


Friday, November 21, 2014

French Onion Soup

I LOVE french onion soup. It's one of my always order items when it's on a menu. Even in the dead heat of summer- I'll order french onion soup if a restaurant will make it for me. It makes me happy. But for some reason I always avoided making it because I thought it would be an undertaking. But in reality- it's really simple (minus bawling while cutting onions) and delicious. And it can be dressed up for a party or enjoyed in pajamas while watching Scandal. And it can be made a few days ahead and tastes even better! This is a great fall/winter comfort meal! 


French Onion Soup

Fridge: 
3/4 cup apple cider 
2 large sprigs thyme (approx 3/4 tbs) 
2 tbs butter 

Counter:
6 1/2 cups yellow onions, thinly sliced 
2 garlic cloves, minced 
1/3 cup dry white wine 
1/2 cup apples, peeled and grated (I used a small Granny Smith) 

Pantry:
4 cups beef stock
2 1/2 cups chicken stock 
2 bay leaves 
1 1/2 tsp salt
1/4 tsp black pepper 

Optional topping:
Rustic bread, I used Portuguese 
Swiss cheese of your choice- Gruyere, Emmental, jarlsberg- whatever. 

Tools:
Large dutch oven with lid
Wooden spoon 
Cutting board
Chopping knife 
Measuring cups/spoons 
Box grater 

Melt butter over medium to low heat in the dutch oven pot. Once melted add your onions and 3/4 tsp of salt- stir and then allow to sit for 10 minutes to begin to sweat. Add your minced garlic and stir in. Continue to allow the onions to sweat and caramelized, only stirring every five minutes or so. The onions should reduce in size by half and they should begin to become a dark golden brown. Be careful to not burn the edges as this can result in a burned taste in the soup. Turn heat lower if this begins to happen. Just allow the onions to slowly caramelized- the whole process can take between 30-45 minutes. 

Once onions have caramelized, preheat your oven to 325 degrees. Add the white wine to the pot and allow to simmer for a few minutes and reduce. Then add the apple juice, both chicken and beef stock, thyme, bay leaves and remaining 3/4 tsp salt and 1/4 tsp of black pepper. Bring the soup to a simmer and then cover with the lid and place in the oven. Cook for 1 hour in the oven. 

Remove soup from the oven and allow to cool for 10 minutes before tasting and seasoning to your preference. 

To serve: I lightly toast my bread and then you have two choices. Sometimes I prefer to eat the soup with couton style bread to avoid the stringy cheese dripping bites. And sometimes I like the stringy cheese drippy bites and use a full slice of bread. Once bread is lightly toasted you can cut it into cubes for crouton style and place on a lined baking sheet. Grate your Swiss cheese over the bread cubes and broil for a few minutes on high- checking frequently to avoid burning. 

OR you can fill a oven proof soup bowl with soup and place a lightly toasted piece of rustic bread on top with either a slice of Swiss cheese or grate cheese all over it- typically a lot of cheese! Place under a high broiler and broil for a couple minutes while cheese melts, gets bubbly and golden brown. This results in the stringy drippy cheese. Both versions are delicious- one just makes for more civilized eating. Enjoy it! Xo


Crouton and more civilized eating version

Stringy drippy more cheesy version

Wednesday, November 19, 2014

Orange Cranberry Pecan Muffins

I always try to make some sort of bread or muffin that the kids can snack on all week and I try to make it healthy, but tasty and I will say that this muffin was a success this week! The kids enjoyed it and I must say I also did. Eating muffins warm out of the oven is just heavenly. It's nice to have homemade muffins/bread on the counter that you can grab on-the-go, especially with kids. To me- it makes much more sense to spend 10 minutes making a batter to throw in the oven than giving your kids store bought baked goods with ingredients you can't pronounce. It's really a no-brainer. And once you get the hang of making muffins/bread- you can make tons of varieties to mix it up and usually the base batter stays the same. It's simple and worth it! 


Orange Cranberry Pecan Muffins

Fridge:
1 egg
1/4 cup sour cream 
1/2 cup milk 

Counter:
1/2 tbs orange zest
1/4 cup orange juice, I squeezed mine fresh from the orange- hence this being in counter section 

Pantry:
1 3/4 cups ap flour 
1 cup sugar
1/2 cup dried cranberries
1/2 cup pecans, chopped
2 tsp baking powder
1/2 tsp salt
1 tsp vanilla extract 
1 tsp pumpkin pie spice 
1/3 cup canola oil 
Canola oil spray or muffin liners 

Tools:
Large bowl
Medium bowl
Whisk
Spoon or ice cream scoop
Measuring cups/spoons 
Muffin tray 

Preheat oven to 350 degrees. Spray muffin tray with canola or baking spray. Or use liners. 

In the large bowl add flour, salt, baking powder and pumpkin pie spice. Mix well. 

In medium bowl whisk together the egg, sour cream, milk, canola oil, vanilla extract, orange zest and orange juice. Whisk well. 

Pour the liquid bowl into the dry bowl. Combine well and then add the cranberries and pecans. Mix and spoon batter into the muffin tray. Full 3/4 of the way up. Place tray into the oven and bake for 27-30 minutes or until the muffins are a golden color and firm but spongy to touch. 

Remove from oven and allow to cool for a few minutes before enjoying one (or two) still warm! Xo 


Tuesday, November 18, 2014

Stover Beef Stew

This week was my dear friend Anne's birthday and one of the many reasons we have always got along so well is that we both love food, passionately. Now that I think about it a  great portion of our memories revolve around food. She taught me that you can use mayo instead of butter on a grilled cheese, she introduced me to Boursin cheese, and she taught me how to make her mother's super easy, delicious, heart warming, perfect-for-cold-weather beef stew. I can easily whip up a beef bourguigbon and go the fancy French route with beef stew but I like the comfort and simplicity of this stew. It really works for the busy family! 


Stover Beef Stew

Fridge: 
1 3/4 lbs stewing beef, cubed 
2 cups carrots, 1/2 inch slices
3/4 cups white button mushrooms, sliced 
1/2 cup celery, 1/2 inch slices

Counter:
1/2 cup yellow onions, diced 
1/2 cup water 

Pantry:
2 cans of Campbell's french onion soup
2 cans of Campbell's golden mushroom soup
1 tsp salt
1/2 tsp black pepper 
1 tbs olive oil 

Tools:
Large Dutch oven or pot that can go into the oven with lid 
Tongs 
Cutting board
Chopping knife
Measuring cups/spoons
Wooden spoon 
Large plate 

Preheat oven to 275. 

Heat Dutch oven over stovetop at medium heat. Add olive oil and heat. Sprinkle 1/2 tsp salt and 1/4 tsp of black pepper over beef cubes. In batches sear the beef pieces for a couple minutes on each side to get some color on the beef and caramelization in the pot. Use the tongs to remove the beef to a plate. And continue searing the rest of the beef. Do not overcrowd the pot while searing the beef. 

Once beef is seared and set aside, add in all the vegetables at once to the pot. Do not clean or rinse the pot. Add 1/2 tsp salt and 1/4 tsp of black pepper. Mix well and sauté for 3 to 5 minutes. 

Add the beef and all its juices back into the pot. Mix well and add the 4 cans of Campbell's soups and 1/2 cup of water. Stir the soups into the pot and cover the Dutch oven with its lid. Place into the oven and cook for 3 hours. Stir a few times throughout the cooking process. 

Remove from oven and serve with your choice of sides- the kids wanted egg noodles and that's how the Stovers serve it as well. But zoodles, rice, pasta or quinoa would work as well. And a couple slices of rustic bread with butter- perfection! Enjoy this! I'm currently eating it for my mid morning snack! So good! Xo

Searing beef- don't overcrowd the pan. Meat needs space to dear well.


Monday, November 17, 2014

Croque Madame

Croque madame is something I discovered in culinary school. How I had survived 24 years without them is beyond me!?! These are the delicious and overly decadent French version of grilled ham and cheese with the excellent addition of a fried egg on top. It's true comfort food and perfect for rainy days like today. 


Croque Madame

Fridge:
4 eggs 
1/4 cup of Asiago cheese (or Gruyere if you want to be uber French) 
1/4 cup parmesan cheese 
2 cups milk, warm 
1 1/2 tbs butter 
4 tsp Dijon mustard 
1/2 Gruyere or Emmental or a Swiss cheese of your choice 
12 slices of deli ham


Counter:
8 pieces of rustic bread of your choice, I used Portuguese bread 
8 thin slices of tomato (optional) 

Pantry:
2 tbs ap flour 
Pinch of nutmeg
Pinch of salt 
Few cracks of black pepper 
2 tsp olive oil 

Tools:
Large baking tray, lined with parchment or foil
Small pot
Whisk 
Measuring cups/spoons
Ladle 
Nonstick sauté pan 
Spatula
Toaster or toaster oven 
Mandoline 

Lightly toast all the pieces of bread. Set aside for later.

Melt the butter in the small pot over medium heat. Once melted, add the flour. Whisk and cook the roux for 1 minute and then add the warm milk. Bring the bechamel sauce to a simmer, while stirring so it doesn't burn on the bottom. Once it begins to thicken, add the asiago and parmesan cheese and turn off heat. Add a pinch of ground nutmeg and a few cracks of black pepper. Whisk until cheese melts and sauce thickens. This is called sauce mornay in French. Set this aside while you prep the sandwiches.

Using the Dijon mustard- spread 1 tsp on each of the 4 slices of bread. Top each piece of bread with 3 slices of ham each. Then add two slices of tomatoes per piece, if you're using and then divide the grated Gruyere or swiss amongst the 4 pieces. 

Turn on your broiler on high at this point and place the loaded sandwich halved onto your lined baking sheet. Place below the broiler and watch carefully as the cheese melts. 

After the cheese begins to melt, remove the sandwich halves and place the lightly toasted remaining bread pieces on top. Ladle the sauce mornay on top of each sandwich. Place the sandwiches back into the broiler oven and watch carefully as the top bubbles and begins to brown. Remove from the oven once they are all nicely toasted and bubbly. 

While your sandwiches broil, heat your sauté pan over medium to low heat and add olive oil. Crack your eggs into the pan and sprinkle with salt and pepper. Turn heat to low and gently fry the eggs. I added water and a lid to almost poach my eggs. A runny yolk just makes the sandwich!  

Once the eggs are fried and the sandwiches have been broiled- place the egg on top and serve. I usually like to serve this sandwich with a lightly dressed arugula salad- just lemon and olive oil, salt and pepper. Easy and light which makes up for the rich sandwich!! Perfect for brunch! Enjoy it! Xo


Friday, November 14, 2014

Mango Curry Chicken Salad

Curry chicken salad is a favorite of mine (let's be honest- what isn't?). And as it was a girlfriend Janet's birthday this week, I decided it would be perfect to make this delicious dish for a  nannies luncheon. It's easy to throw together the night before and ready to throw on top of a salad right before they arrived. Plus Charlie loved it and prefered the mango curry chicken salad over the squeezy fruits the other kids were eating. It was a win all around! 


Mango Curry Chicken Salad 

Fridge:
5 skinless chicken breasts- bone in or not but there's more flavor with bone in
1 cup celery, diced small
1/2 cup scallions, thinly sliced
1 cup plus 1/2 cup ripe mango, diced
1 cup grapes, quartered 
3/4 cup Greek yogurt
1/3 cup mayo 
1/2 tbs Dijon mustard 

Counter:
1/2 cup water or chicken stock
2 tsp lemon juice 
1/4 cup yellow onion, thinly sliced
1 garlic clove, minced 

Pantry:
1 tbs plus 1 tsp curry powder
1 tsp plus 1/2 tsp salt
1/4 tsp black pepper 
2 tsp olive oil

Tools:
Blender or food processor
Sauté pan 
Casserole dish (big enough to fit chicken breasts) 
Aluminum foil 
Large bowl
Blender 
Cutting board 
Chopping knife

Preheat oven to 400 degrees. Add the chicken to the casserole dish and sprinkle with 1 tsp curry powder, 1/2 tsp salt, 1/4 tsp black pepper and then pour 1 tsp olive oil over all the breasts. Rub the spices and oil all over the chicken and then pour 1/2 cup of water or chicken stock into the dish. Cover with aluminum foil and bake for 30-45 minutes. Begin checking after 30 minutes- cooking time depends on thickness/size of chicken breasts. Remove from the oven once done and allow to cool. 

While chicken cools- heat the sauté pan over medium heat. Add a tsp of olive oil and add the onion slices and minced garlic. Cook for 5-10 minutes until the onions are softened. Remove from pan and allow to cool. 

Once cooled, cut the chicken into bite size cubes. Place in the large bowl. Add scallions, grapes, celery and 1/2 cup of diced mango. Mix together. 

In your blender add greek yogurt, mayonnaise, Dijon mustard, 1 cup mango, 1 tbs curry powder, 1 tsp salt, lemon juice and cooled onions and garlic. Pulse the dressing until smooth. This definitely requires very ripe mangoes. 

Pour the dressing over the chicken salad and refrigerate for a few hours to allow flavors to meld. 

I served mine over a salad of romaine lettuce, dried cranberries, toasted pistachios, sunflower seeds, grape tomatoes and avocado. It was delicious!! And you don't even need dressing because the chicken salad is so yummy! Enjoy it! Xo


Wednesday, November 12, 2014

Lemon Poppyseed Yogurt Bread

Lemon poppyseed bread is one of those snacks (desserts?) that pops into my head and I just HAVE to run out and buy a loaf or make it myself. Usually I choose the prior out of sheer urgency to fulfill my craving. But this time I made it at work and both Charlie (18 month old) and I found it hard to resist checking and rechecking the oven for the bread to be done. It smelled so good cooking!! I changed up my old recipe to include greek yogurt and therefore less butter. It was delicious! 


Lemon Poppyseed Yogurt Bread

Fridge: 
2 eggs
1 1/4 cup greek yogurt 
2 tbs butter, melted 

Counter:
Zest of 1 lemon (little over 2 tsps)
3 tbs lemon juice 

Pantry:
2 cups ap flour
2 tsp baking powder 
1 tsp lemon extract 
1/2 tsp salt
3/4 cup white sugar 
1/4 cup canola oil
1 tbs plus 1 tsp poppyseeds 
Canola oil spray 

Tools:
Large bowl
Medium bowl
Whisk
Baking spatula 
Measuring cups/spoons 
Microplane
Bread pan

Preheat oven to 325 degrees. Spray bread pan with canola oil spray. 

In large bowl mix flour, baking powder, sugar, salt, lemon zest and poppyseeds.

In medium bowl add greek yogurt, melted butter, lemon juice, lemon extract, canola oil and eggs. Whisk well.

Pour the liquids into the dry ingredients bowl. Mix well and pour batter into greased bread pan. 

Place in the oven and bake for 30 to 35 minutes or once the top is light golden and is spongy but firm to touch. 

Remove from oven and allow to cool for 10 minutes before turning the bread pan upside onto a plate or cutting board to remove bread. 


Optional glaze: 1 tbs lemon juice mixed with 3/4 cup confectioners sugar. Mix well and pour on top of bread once cooled slightly. Enjoy it!! Xo


Tuesday, November 11, 2014

Broccoli Slaw Salad

Broccoli slaw always reminds me of summer bbqs and southern pig roasts. Someone always brings a broccoli salad to a pig roast. And it's not usually me. I opt to make the mac n cheese or fried green tomatoes or something universally loved. But everytime I eat the broccoli slaw at a party- I wish I had made it and I always mentally add it to my list of things to make at home but for some reason I never do. So this past week I finally made my version of broccoli slaw and it was SO good! 


Broccoli Slaw Salad 

Fridge: 
4 cups broccoli, chopped small (bite size)
2 cups Brussels sprouts, thinly sliced 
1 1/2 cups carrots, julienned 
1/2 cup scallions, thinly sliced 
1/2 cup mayonnaise 
1/4 cup milk 
1 tbs italian parsley, minced 

Counter:
Juice 1/2 lemon 
2 garlic cloves, minced 

Pantry:
1/2 cup toasted pepitas
1 cup dried cranberries 
1 tsp salt
1/2 tsp black pepper 

Tools:
Medium pot, boiling salted water 
Large bowl
Colander 
Mixing spoon 
Small bowl
Fork or whisk 
Medium bowl filled with ice and water 
Measuring cups/spoons
Cutting board
Chopping knife 

Make sure the pot of salted water is at a rolling boil. Add the broccoli and thinly sliced Brussels sprouts to the pot. Boil for 1 minute and the drain in the colander. Add straight to the pot of ice water and mix around to stop cooking. 

Add the broccoli and brussels sprouts to the large bowl. Add cranberries, pepitas, carrots, scallions and 1/2 tsp of salt to the bowl. Mix well.

In the small bowl whisk together mayo, milk, 1/2 tsp salt, 1/2 tsp black pepper, juice of 1/2 lemon, minced garlic cloves and minced parsley. Combine well and set aside until ready to serve. 

Once the salad is ready to serve, add the dressing and mix well. Serve right away unless you prefer your slaw slightly wilted, then refrigerate and serve in an hour. Enjoy! Xo


Monday, November 10, 2014

Vegan Butternut Squash Soup

Fall is definitely the beginning of the soup and stew season. And butternut squash soup is always top of the list at my house. The reason I love butternut squash soup is that it's the easiest soup to make. It's really just throwing a few things in the pot, putting a lid on it and then blending it at the end. And it's always delicious. You really can't go wrong with it. You can dress it up for dinner parties or enjoy it in your pjs.


Vegan Butternut Squash Soup 

Fridge:
2-2 1/2 lbs butternut squash, peeled and cut into 1-2 inch cubes

Counter:
Approx 4 1/2 cups of water (enough to cover the vegetables 3/4 of the way up)
2/3 cup apples, peeled and cubed 
2/3 cup yellow onions, small dice 

Pantry:
1/4 tsp ground cinnamon
Pinch of nutmeg
1 1/4 tsp salt
Few cracks of black pepper

Optional topping:
Pomegranate seeds 
Sunflower seeds

Tools:
Medium pot with lid
Blender or food processor 
Cutting board
Chopping knife
Measuring cups/spoons 

Throw all the ingredients in the pot and cover 3/4 of the way up with water. I used about 4 1/2-3/4 cups in my pot. Cover with the lid and place over medium to low heat. The vegetables/fruit will simmer and steam at the same time. 

Simmer for 25-30 minutes until butternut squash is soft and beginning to fall apart. 

Ladle the entire pot into a blender (I had to do mine in two batches) and pulse until desired consistency is reached. I prefer mine completely smooth and then I add texture with the pomegranate seeds and sunflower seeds. 

At this point you can add 1/2 cup of light cream if you want a creamier soup but I wanted to keep this version vegan. Now how simple is that soup?!? Xo

Everything in the pot!


Friday, November 7, 2014

Banana Corn Muffins

Does anyone else feel like they constantly have overripe bananas to use up? As someone who hates waste- I am always trying to use up those super soft bananas and since I love muffins and breads- that's usually the route I go. Today we had a play date with a bunch of under two year olds and they all happily munched on these banana corn muffins. These are definitely kid friendly and easy to throw together. These are a great use of leftover ripe bananas and I had the muffins out of the oven by 8am! Can't beat that! Give it a go! 


Banana Corn Muffins 

Fridge:
1/4 cup butter, melted 
1 egg 

Counter:
4 overripe bananas

Pantry:
1 1/4 cup cornmeal 
1cup ap flour 
1/2 tsp salt
2 tsp baking powder
3/4 cup white sugar 
1/4 cup canola oil
1 tsp vanilla extract 
Canola oil spray 

Tools:
Electric hand mixer
Muffin tray
2 medium bowls
Ice cream scoop or large spoon

Preheat oven to 350 degrees. Spray your muffin tray with canola oil. 

In one bowl mix together cornmeal, flour, baking powder and salt. Combine well.

In the other bowl add the ripe bananas, egg and sugar- blend together with the electric mixer. Then add the melted butter, canola oil and vanilla extract and mix again. 

Pour the wet ingredients into the dry ingredients and blend together with electric mixer. Once the batter has come together, use an ice cream scoop to fill the muffin tray.

Place the tray in the preheated oven and bake for 25-28 minutes or until the edges are golden and the top is firm but spongy to touch. 

Remove and allow to cool for 5-10 minutes before slabbing with butter and enjoying! Xo


Allie and Charlie enjoying the muffins on the way to school! 


Thursday, November 6, 2014

Butternut Squash & Spinach Lasagna

Is it possible to make a super healthy lasagna? I'm sure it is but I am not one to skimp on cheese and going vegetarian with a lasagna is about as close to healthy as it gets for me. Both my bosses and the kids I nanny for really enjoyed this lasagna- so it is a great fall family meal!


Butternut Squash & Spinach Lasagna 

Fridge: 
2 1/2- 3 lbs of butternut squash, thinly cut
9 oz spinach 
3/4 cup heavy cream 
1 1/2 cups whole milk
1 tbs butter 
1 1/2 cups Asiago cheese, grated (extra for sprinkling on top-optional) 
1/2 cup parmesan, grated (extra for sprinkling on top- optional) 
1 egg
3 cups ricotta, I use whole milk ricotta

Counter:
3 garlic cloves, minced 

Pantry:
20 pieces of lasagna pasta* 
1 1/2 tbs ap flour
1/4 tsp ground cinnamon
1/4 tsp ground nutmeg 
1 1/2 tsp salt 
1 tsp fresh black pepper 
1 1/2 tsp olive oil 
Canola spray 

Tools:
Large pot with boiling salted water
Colander
Large casserole dish 
Medium bowl 
Mixing spoon
Mandoline or sharp knife to thinly slice butternut squash 
Large sauté pan 
Wooden spoon 
Whisk 
Measuring cups/spoons 

First add the lasagna to your large pot of boiling salted water. Cook for 5-7 minutes until it is just under al dente. Drain in colander and set aside. 

Heat the same large pot over medium heat. Add the butter and allow to melt. Once melted add the flour and whisk together for a couple minutes to cook out the flour taste. Then add the heavy cream and milk. Let this come to a simmer and then add the asiago and parmesan cheese. Whisk this all together and allow cheeses to melt. It's ok if the sauce is lumpy- it will melt once lasagna is baked. 

Heat the sauté pan over medium to high heat and add olive oil. Once hot- add the minced garlic. Heat garlic for 30 seconds and then add the spinach. Allow the spinach and garlic to cook for a couple minutes and then turn off the heat. Squeeze out the excess liquid from the spinach and set aside for layering. 

In the medium bowl- add the ricotta cheese, egg, ground cinnamon, ground nutmeg, 1/2 tsp of salt and 1/2 tsp of black pepper. Mix well. 

Preheat oven to 375 degrees. Spray your casserole dish with canola oil and begin to create your lasagna. 
Here is how I layered mine but keep in mind- you can layer however you want because it all tastes the same: 
Thin layer of ricotta mixture, pasta, butternutsquash, salt/pepper, cheese sauce, pasta, ricotta, spinach & garlic, pasta, butternut squash, salt/pepper, cheese sauce, pasta, butternut squash, salt/pepper and sprinkled with cheeses to finish. 

Cover the lasagna with aluminum foil and bake at 375 for 45 minutes. Remove foil and cook uncovered for another 25 minutes. Remove from oven and allow to cool for 15 minutes before serving. 


Enjoy it!! Xo


* my casserole dish fits 5 pieces of lasagna per layer and I had 4 layers within this lasagna so I used 20 pieces. I recommend laying out your lasagna into the casserole dish to see how many you need per layer and then multiply by 4 and cook that many pieces of pasta. 


Wednesday, November 5, 2014

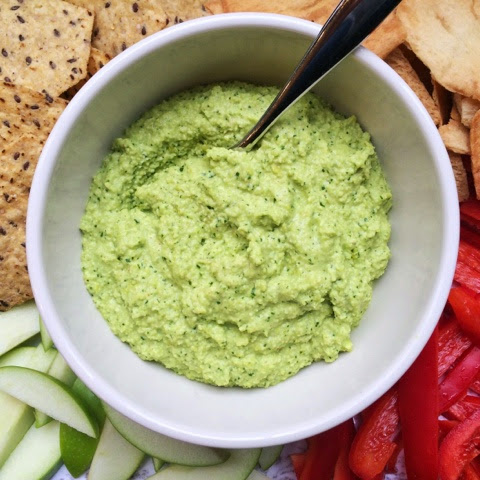
Edamame & Cilantro Hummus

I love hummus and I love edamame. Why not combine the two loves? This is great served with a crudite platter or even served on toast points. I like to add it to my veggie roll up sandwiches as well. It's very versatile and easy to throw together in the food processor. 


Edamame & Cilantro Hummus 

Frozen: 
8 oz shelled edamame, cooked and cooled

Fridge:
2 1/2 tbs cilantro, minced

Counter:
Juice 1/2 lemon, approx 1 1/2-2 tbs 
1 garlic clove, minced 
1/3 cup water 

Pantry:
1/2 tsp ras el hanout* 
3 1/2 tbs olive oil 
1/2 tsp salt
Few cracks of pepper 
1/2 tsp siracha (optional) 

Tools:
Food processor or blender
Cutting board
Chopping knife
Measuring cups/spoons

Add the cooled edamame, cilantro, garlic, salt, pepper, ras el hanout, lemon juice and water to the food processor. Turn on processor and then stream in the olive oil. Process until smooth. Taste and season to your preference. 


*ras el hanout is a Moroccan spice made up of multiple spices. It's accessible at most grocery stores. I bought mine at Stop & Shop made by McCormick Gourmet spices- and it says Moroccan seasoning, ras el hanout on the front.


Charlie loved it!! Enjoy it! Xo

Tuesday, November 4, 2014

Mama Kern's Monkey Bread

On my first day of college I met one of my favorite people on the planet, Mike Kerner. Not that I want to blow up his ego anymore than it is but he is probably one of the funniest and coolest kids I know. And I must say- he gets it all from his parents!! The Silver Fox and Mama Kern's are one of the reasons I return to the Outer Banks every summer- they are genuinely amazing people. And Mama certainly knows her way around a kitchen. She introduced me to delicious seafood lasagna and her famous monkey bread. And although I know her recipe is different than mine- this is my ode to her and her famous monkey bread. Thank you Mama and Papa Kern's for always putting up with us crazy kids taking over your home for a long weekend! You guys are the best!! 


Mama Kern's Monkey Bread 

Fridge: 
3/4 cup milk plus 1 1/2 tbs for frosting
1/4 oz package rapid rise yeast 
1/4 cup cream cheese
2 tbs butter melted plus 4 tbs melted butter, separate 
1 tbs butter, softened 

Counter:
1/2 cup warm water 

Pantry: 
1/4 cup white sugar plus extra separate 1/4 cup 
1/3 cup brown sugar 
1 1/2 tsp salt
3 1/2 cups ap flour plus extra to sprinkle on counter for kneading 
1 1/2 tsp ground cinnamon 
2/3 cup confectioners sugar
1/2 cup minced pecans or walnuts (optional) 
Canola oil spray 

Tools:
Large mixing bowl
Plastic wrap 
3 small mixing bowls 
Bundt pan 
Large plate 
Measuring cups/spoons 

First add the warm water to a small bowl and pour in the rapid rise yeast packet. Allow to sit and bubble up for 3-5 minutes. This allows the yeast to begin to waken up. 

In the large mixing bowl- add flour, salt, and 1/4 cup white sugar. Mix well. Make a well in the center and add 3/4 cup of milk, 2 tbs melted butter, cream cheese and yeast water mixture. Using a mixing spatula begin to mix until it can't come together anymore. Sprinkle a little flour on a clean surface and dump the dough on it. Begin to knead together the dough. If it's too sticky sprinkle a tiny bit of flour at a time. Too much flour will make the dough tough- so be careful. Your goal is too have a tight dough but that is very smooth and easy to work with. You want it to be shiny and smooth (see photo below). Knead the dough for 5-7 minutes straight. This takes work and muscles- can be fun to get others involved at this point. 

Once dough is kneaded, spray the large clean bowl with canola oil and place dough in the center. Cover bowl with plastic wrap and place in a warm spot for 1-2 hours so it can double in size. 

Grease your bundt pan with 1 tbs softened butter- make sure to get into each nook and cranny. 

After dough has risen, begin to take 1-2 inch pieces off the dough and roll into small balls. I made 36 small dough balls. In a small bowl add the 4 tbs melted butter and on the large plate add 1/3 cup brown sugar, 1/4 cup white sugar and 1 1/2 tsp ground cinnamon. Add the minced nuts to this plate if you are using as well. Roll each dough ball in the melted butter and then roll in the cinnamon sugar plate. Place into the greased bundt pan. After you cover the bottom of the pan with balls, stagger the next layer in between the bottom layer dough balls. Continue to do this until all the dough balls are buttered and covered in cinnamon sugar. Cover the bundt pan with plastic wrap and place in a warm spot to rise for 1-2 hours again. 

Preheat the oven to 350 degrees once the dough balls have almost doubled in size (see photo below). Remove plastic wrap and place in the oven to bake for 30-35 minutes. 

Remove from the oven once the top is golden and bread is firm but spongy to touch- allow to cool for 5 minutes to set up and then flip the bundt pan onto a large serving tray. Try some while still warm- it's soo good!! 

Quick cheat method: instead of homemade dough- you can use store bought biscuit dough and begin at the buttering and cinnamon sugar stage. 


Dough while kneading 


Before and after first rise 


Before and after second rise 


You can see how the dough balls are staggered- makes it easy to just pull a piece off like a monkey. 


Beautiful end result- great to take to a brunch! 


The kids obviously loved this!! Who wouldn't?? This is definitely a great addition to weekend breakfast/brunch!! Xo