Showing posts with label bread. Show all posts

Wednesday, October 19, 2016

Pumpkin Zucchini Bread

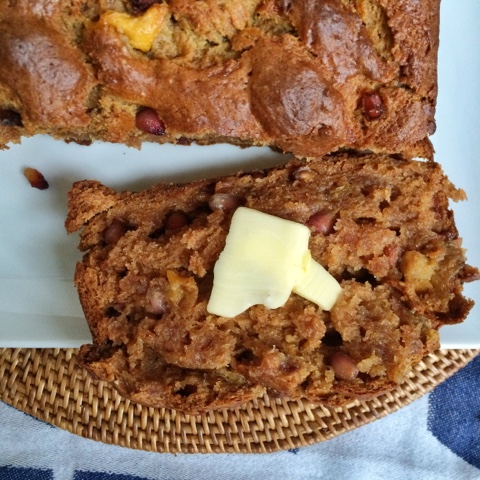
Yes, folks, it's that time of year again. Pumpkin season. Although I'm not the biggest fan of people adding pumpkin spice to everything, there are occasions, such as this, that pumpkin spice is necessary. But please- keep it out of my candy, chips and hummus (yes I've seen pumpkin spiced hummus). This was one of those recipes where I ha a zucchini on it's last legs and needed to find a use for it and I must say- it was well used. This is a great addition to breakfast or snack time. And a great way to get rid of that extra can of pumpkin puree laying around from last year's holiday season.


Pumpkin Zucchini Bread

Fridge:
1 1/2 cups zucchini, shredded
2 eggs

Pantry:
1 3/4 cup flour
1 cup pumpkin puree (I use Trader Joe's canned organic pumpkin puree)
1 cup white sugar
1/2 cup canola or vegetable oil
1 1/2 tsp pumpkin spice
1/2 tsp ground cinnamon
1 1/2 tsp vanilla extract
1/2 tsp baking soda
1 tsp baking powder
1/2 tsp salt
1/3 cup walnuts, chopped
Spray for baking dish

Tools:
2 medium mixing bowls
1 loaf pan
Whisk
Measuring cups/spoons
Box grater
Chopping knife
Cutting board
Baking spatula

Preheat oven to 325 degrees. Spray the loaf pan with canola oil.

In one bowl add all the dry ingredients: flour, sugar, salt, baking powder, baking soda, pumpkin spice, and cinnamon. Mix well.

In the other bowl add eggs, pumpkin puree, vanilla, and oil. Mix well. Add zucchini and walnuts and slowly begin to add your dry ingredients. Whisk all the ingredients together well but do not over mix.

Pour batter into the prepared loaf dish. Bake for 45 to 55 minutes or until a toothpick comes out clean when pricked into the center of the bread. Remove and allow to cool slightly before removing from the loaf pan. Serve warm with some butter. Yum!! Enjoy. xo


Sunday, January 31, 2016

Simple Sunday: Chocolate Banana Bread

Easy as a Sunday morning is my constant life goal. Not that I'm avoiding hard work or complex life situations- bring it on! But sometimes you just need simplicity. Like right now I want to be in bed, drinking a chai latte and doing the Sunday crossword with my boyfriend with our dog at our feet. The simple life.

This Sunday series will be filled with delicious, easy, go-to recipes that won't aggravate you on a Sunday. They will fit right in with Sunday living. And we are kicking it off with Chocolate Banana Bread. It takes regular banana bread just a simple step forward and you can use this bread as a brunch side, a dessert with vanilla bean ice cream or even make it into french toast!


Chocolate Banana Bread

Fridge:
1/3 cup sour cream
1/4 cup butter, melted
1 egg

Counter:
3 overripe bananas

Pantry:
1 1/2 cups all purpose flour
1/2 tsp baking soda
1 1/2 tsp baking powder
1/2 tsp salt
1/3 cup brown sugar
3/4 cup white sugar
1 tsp vanilla extract (or banana extract if you have it on hand)
1/4 cup coconut oil, liquid form (you can microwave for 15 seconds if solidified)
1/2 cup cocoa powder, unsweetened
1/2 cup semi sweet chocolate chips, mini or regular
canola oil spray or butter for pans

Tools:
2 large mixing bowls
1 whisk
1 spatula
1 9x5 inch bread pan
Electric hand mixer

Preheat oven to 325 degrees.

In one bowl add the bananas, cooled melted butter, both sugars, egg, sour cream, vanilla extract and coconut oil. Using electric mixer- mix together well.

In the other bowl add flour, baking powder, baking soda, salt, and cocoa powder. Mix together well.

Using your spatula, slowly mix the dry ingredients into the wet ingredient bowl. Add the chocolate chips and mix until just incorporated.

Spray your bread pan with canola oil spray and pour the batter into it. Place into the oven and bake for 50 minutes to an hour- checking after 40 minutes. I like to turn my bread around half way to ensure even baking.

Remove from oven when top feels spongy and light to the touch. Allow to cool (if you can!) for 15 minutes before slicing. Enjoy! xo


Tuesday, December 2, 2014

Persimmon & Pomegranate Bread

I will admit that I have never cooked with persimmons until today. I have had them in salads but that's about my extent of my knowledge and use. Shame on me! Now that they are in season- I'm going to try to use them more often. I have also been wanting to add pomegranates to a bread/muffin for a while now to see if the crunch with make up for not using nuts (my boss is allergic). And I will say that the combo of these two winter fruits make quite a tasty treat! Now I want to try persimmon ice cream with pomegranate syrup. On the to-do list! 


Persimmon & Pomegranate Bread

Fridge:
1/4 cup butter, melted
2 eggs 
1 cup pomegranate seeds*
2 cups ripe persimmon, puréed 

Pantry:
3 cups ap flour
1 cup white sugar
1/2 cup brown sugar 
1/2 tsp vanilla extract 
1/2 tsp salt
2 tsp baking powder
1/2 tsp baking soda
1/2 tsp ground cinnamon 
1/8 tsp ground ginger
1/8 tsp ground nutmeg 
1/4 cup canola oil
Canola oil spray 

Tools:
Bread baking tray 
Electric hand mixer 
Spatula 
Measuring cups/spoons 
2 medium bowls 

Preheat oven to 325 degrees. Spray your bread tray with canola oil. 

In one bowl add flour, both sugars, baking powder, baking soda, salt, ginger, cinnamon and nutmeg. Mix well. 

In the other bowl, add the persimmon puree, eggs, vanilla extract, melted butter and canola oil. Use your electric hand mixer to blend well. 

Pour 1/2 the dry bowl into the wet bowl. Mix with electric mixer until combined. Then add the rest of the dry ingredients to the bowl. Mix well again. Using the spatula, hand mix in the pomegranate seeds. 

Pour the batter into the greased baking tray. Place into the oven and bake for 55 to 1 hour 10 minutes. The top should be a medium brown and a toothpick should come out clean when pricked into the center. 


*A great way to get pomegranate seeds out of a pomegranate is to cut the pomegranate into four pieces on a plate, the juice can stain boards. Put a colander into a large bowl and fill it with water. Put the four pieces into water and pull the seeds out. The white pith of the pomegranate floats and is easier to remove this way as it separates from the seeds. Once the seeds are out and you have removed the pith, you can lift the seeds out with the colander- takes all of five minutes! 


Wednesday, November 12, 2014

Lemon Poppyseed Yogurt Bread

Lemon poppyseed bread is one of those snacks (desserts?) that pops into my head and I just HAVE to run out and buy a loaf or make it myself. Usually I choose the prior out of sheer urgency to fulfill my craving. But this time I made it at work and both Charlie (18 month old) and I found it hard to resist checking and rechecking the oven for the bread to be done. It smelled so good cooking!! I changed up my old recipe to include greek yogurt and therefore less butter. It was delicious! 


Lemon Poppyseed Yogurt Bread

Fridge: 
2 eggs
1 1/4 cup greek yogurt 
2 tbs butter, melted 

Counter:
Zest of 1 lemon (little over 2 tsps)
3 tbs lemon juice 

Pantry:
2 cups ap flour
2 tsp baking powder 
1 tsp lemon extract 
1/2 tsp salt
3/4 cup white sugar 
1/4 cup canola oil
1 tbs plus 1 tsp poppyseeds 
Canola oil spray 

Tools:
Large bowl
Medium bowl
Whisk
Baking spatula 
Measuring cups/spoons 
Microplane
Bread pan

Preheat oven to 325 degrees. Spray bread pan with canola oil spray. 

In large bowl mix flour, baking powder, sugar, salt, lemon zest and poppyseeds.

In medium bowl add greek yogurt, melted butter, lemon juice, lemon extract, canola oil and eggs. Whisk well.

Pour the liquids into the dry ingredients bowl. Mix well and pour batter into greased bread pan. 

Place in the oven and bake for 30 to 35 minutes or once the top is light golden and is spongy but firm to touch. 

Remove from oven and allow to cool for 10 minutes before turning the bread pan upside onto a plate or cutting board to remove bread. 


Optional glaze: 1 tbs lemon juice mixed with 3/4 cup confectioners sugar. Mix well and pour on top of bread once cooled slightly. Enjoy it!! Xo


Tuesday, November 4, 2014

Mama Kern's Monkey Bread

On my first day of college I met one of my favorite people on the planet, Mike Kerner. Not that I want to blow up his ego anymore than it is but he is probably one of the funniest and coolest kids I know. And I must say- he gets it all from his parents!! The Silver Fox and Mama Kern's are one of the reasons I return to the Outer Banks every summer- they are genuinely amazing people. And Mama certainly knows her way around a kitchen. She introduced me to delicious seafood lasagna and her famous monkey bread. And although I know her recipe is different than mine- this is my ode to her and her famous monkey bread. Thank you Mama and Papa Kern's for always putting up with us crazy kids taking over your home for a long weekend! You guys are the best!! 


Mama Kern's Monkey Bread 

Fridge: 
3/4 cup milk plus 1 1/2 tbs for frosting
1/4 oz package rapid rise yeast 
1/4 cup cream cheese
2 tbs butter melted plus 4 tbs melted butter, separate 
1 tbs butter, softened 

Counter:
1/2 cup warm water 

Pantry: 
1/4 cup white sugar plus extra separate 1/4 cup 
1/3 cup brown sugar 
1 1/2 tsp salt
3 1/2 cups ap flour plus extra to sprinkle on counter for kneading 
1 1/2 tsp ground cinnamon 
2/3 cup confectioners sugar
1/2 cup minced pecans or walnuts (optional) 
Canola oil spray 

Tools:
Large mixing bowl
Plastic wrap 
3 small mixing bowls 
Bundt pan 
Large plate 
Measuring cups/spoons 

First add the warm water to a small bowl and pour in the rapid rise yeast packet. Allow to sit and bubble up for 3-5 minutes. This allows the yeast to begin to waken up. 

In the large mixing bowl- add flour, salt, and 1/4 cup white sugar. Mix well. Make a well in the center and add 3/4 cup of milk, 2 tbs melted butter, cream cheese and yeast water mixture. Using a mixing spatula begin to mix until it can't come together anymore. Sprinkle a little flour on a clean surface and dump the dough on it. Begin to knead together the dough. If it's too sticky sprinkle a tiny bit of flour at a time. Too much flour will make the dough tough- so be careful. Your goal is too have a tight dough but that is very smooth and easy to work with. You want it to be shiny and smooth (see photo below). Knead the dough for 5-7 minutes straight. This takes work and muscles- can be fun to get others involved at this point. 

Once dough is kneaded, spray the large clean bowl with canola oil and place dough in the center. Cover bowl with plastic wrap and place in a warm spot for 1-2 hours so it can double in size. 

Grease your bundt pan with 1 tbs softened butter- make sure to get into each nook and cranny. 

After dough has risen, begin to take 1-2 inch pieces off the dough and roll into small balls. I made 36 small dough balls. In a small bowl add the 4 tbs melted butter and on the large plate add 1/3 cup brown sugar, 1/4 cup white sugar and 1 1/2 tsp ground cinnamon. Add the minced nuts to this plate if you are using as well. Roll each dough ball in the melted butter and then roll in the cinnamon sugar plate. Place into the greased bundt pan. After you cover the bottom of the pan with balls, stagger the next layer in between the bottom layer dough balls. Continue to do this until all the dough balls are buttered and covered in cinnamon sugar. Cover the bundt pan with plastic wrap and place in a warm spot to rise for 1-2 hours again. 

Preheat the oven to 350 degrees once the dough balls have almost doubled in size (see photo below). Remove plastic wrap and place in the oven to bake for 30-35 minutes. 

Remove from the oven once the top is golden and bread is firm but spongy to touch- allow to cool for 5 minutes to set up and then flip the bundt pan onto a large serving tray. Try some while still warm- it's soo good!! 

Quick cheat method: instead of homemade dough- you can use store bought biscuit dough and begin at the buttering and cinnamon sugar stage. 


Dough while kneading 


Before and after first rise 


Before and after second rise 


You can see how the dough balls are staggered- makes it easy to just pull a piece off like a monkey. 


Beautiful end result- great to take to a brunch! 


The kids obviously loved this!! Who wouldn't?? This is definitely a great addition to weekend breakfast/brunch!! Xo

Thursday, October 16, 2014

Pumpkin, Cranberry & Pepita Bread

Since the pumpkin spice craze as taken over the world (halloween costume, anyone??), I've decided to add to it with this awesome pumpkin cranberry pepita bread. It's really delicious! And the kids loved it. It's a favorite amongst everyone- so give it a go! 


Pumpkin, Cranberry & Pepita Bread

Fridge:
1/3 cup milk
2 eggs 

Pantry:
1 1/2 cups pumpkin purée 
2 cups flour 
1/2 tsp salt
1 1/2 tsp baking powder
1 tsp baking soda 
1 1/2 tsp pumpkin spice
1/2 cup white sugar
1/2 cup brown sugar
2 tsp white vinegar
1 tsp vanilla extract 
1/2 cup vegetable or canola oil
1 1/4 cups dried cranberries 
1/2 cup pepitas, roughly chopped 

Tools:
2 greased bread pans 
2 large mixing bowls
Whisk
Mixing spoon 
Measuring cups/spoons
Chopping knife
Cutting board 

Preheat oven to 350 degrees. 

In one bowl add flour, salt, baking powder, baking soda, pumpkin spice, both sugars and whisk together. 

In the other bowl add the milk and vinegar. Allow to sit for a minute before whisking in both eggs, vanilla extract and oil. Once combined- pour the wet ingredients on top of the dry ingredients and using a mixing spoon- combine well. 

Once batter is mixed, add in the cranberries and chopped pepitas. Mix into the batter and then divide the batter evenly among the two greased bread pans. 

Place the pans into the oven and bake for 45-50 minutes. The top should be spongy but firm to touch. 

Remove from the oven and allow to cool for 15 minutes before running a knife around edges to remove bread from baking pan. 

Enjoy it warm with a little bit of butter, sugar and cinnamon. Oh yay!! Xoxo


Charlie was hesitant at first and has since eaten three pieces!! 


Tuesday, September 16, 2014

Parisian Picnic

This past weekend my good friend Catherine and I decided to soak up the last of the summer sun by having a Parisian picnic. As the writer of the awesome lifestyle blog, Chic Geek, Catherine is an amazing stylist and has impeccable taste. So we gathered her tablewares and stylish mind and my love of food and put on our version of a Parisian Picnic.


Being the cheese fiend that I am- we did a few French cheeses, salami, some crusty bread and a few other nibbles. We kept it light but with a variety of flavors. 

I get asked a lot about menu planning and how to decide what to bring or make for parties and I think whether you are a guest or a host- you have to keep it simple! 

Never overwhelm yourself with a complicated menu or something that requires you to be kitchen bound while your friends enjoy themselves. Create menus where the prep work can be done ahead of time so you can actually enjoy yourself! 

As it was Sunday and you know how I enjoy my lazy Sundays- I purchased most of the food for the picnic. I wanted a no fuss day and it came together perfectly! Sometimes it's nice just to enjoy the food- not create it. 

You can see in our photos that the picnic was simple and delicious. Grab a bottle of rosé and get outdoors next weekend!! Your wife, girlfriend, husband, boyfriend, friends- whoever, will love this picnic idea!


See Catherine's blog www.chicgeekblog.com to find out where to purchase her stylish tablewares!!