Monday, February 16, 2015

The Best Ever Keylime Pie

I've said this before and I will most likely say it again: I'm not usually one to brag about my cooking- and I'm definitely not one to brag about my baking. I am not a pastry chef. But since guests at my restaurant (including Floridians) tell me that my keylime pie is the best they've ever had- I feel like it's safe to brag about it. This recipe is SO easy and makes the best keylime pie ever. That's not boastful, is it?! 


The Best Ever Keylime Pie 

Fridge:
6 egg yolks 
1/2 cup or 1 stick unsalted butter, melted 
3/4 cup of fresh squeezed lime juice*
4 tablespoons orange juice*

*if you have actual keylimes use 1 cup of fresh squeezed Keylime juice to substitute the lime and orange juice. 

Counter:
Zest of 2 limes (approx 1 1/2 to 2 tbs) 

Pantry:
1 1/2 (14oz) cans of condensed milk 
2 cups crushed graham crackers 
1/4 tsp salt 
Pinch of cinnamon 

Tools:
Two large bowls
Electric hand mixer or stand mixer
Measuring cups/spoons 
9 inch nonstick pie tray (I use a tart or quiche tray with the removable bottom)

Preheat oven to 350 degrees. To one large bowl add crushed graham crackers, salt and pinch of cinnamon. Mix well and pour the melted butter on top. Mix until all the breadcrumbs are coated and press the coated crumbs into your pie tray. If you do not have a nonstick pie or tart tray- grease your tray.  Make sure to press the breadcrumbs down firmly. Place crust into the oven and bake for 12-16 minutes until top is slightly golden. Remove and allow to cool completely. I usually place mine in the fridge to speed it up cooling time.

Turn oven down to 325 degrees.

Place the lime zest and egg yolks in the other bowl and using your hand mixer blend for 3 minutes or until the yolks double in size and become a light yellow color. Pour in the condensed milk and mix again for another minute or two. Add the lime and orange juice and mix until just incorporated. 

Pour the filling into the cooled crust and place in the 325 degree oven for 20-22 minutes. The pie shouldn't change color and will still seem slightly jiggly in the center. It will set once it cools. Allow to cool for 30 minutes and then place in the fridge for at least an hour. Serve chilled or at room temperature with a dollop of whipped cream. Enjoy! Xo


Monday, January 26, 2015

Jalapeño Pineapple Sangria

This week I FINALLY reopened my restaurant Mamasa. To celebrate we had a beautiful party and I made a big batch of these puppies. Everyone loved them! They have a hint of heat but balanced with the sweet pineapple- they're perfect for a summer day (sorry US but it's 95 degrees down here in Costa Rica). Definitely add this to your summer party 
menu! 


Jalapeño Pineapple Sangria 

Fridge:
2 jalapeños, sliced (seeds kept in for more heat or removed for less) 
4 cups of ripe pineapple, cubed 
1 3/4 cups pineapple juice 

Counter:
2 1/2 bottles Sauvignon Blanc (750 ml) 
1 cup dark rum (not spiced), I used Flor de Cana 
1 cup water 

Pantry:
1 cup sugar

Optional:
1 1/2 cups plain seltzer or soda water 

Tools:
Small pot
Cutting board
Chopping knife
Measuring cups
Large bowl or vessel that can be stored in fridge 

In the small pot add the sugar, water and jalapeños. Simmer over low until sugar dissolves completely. Simmer for 15-20 minutes after sugar dissolves, then turn off the heat and allow to cool completely. This is your Jalapeno simple syrup and can be made up to a week ahead and stored in a cool place. 

In the large bowl or vessel add the bottles of wine, rum, pineapple juice, cooled simple syrup, and pineapple cubes. Mix well. 

If you're using seltzer for a lighter and bubbly sangria- add right before serving. 

I made this sangria the day before so the flavors can meld well. You can make it up to 3 days in advance- just be aware it gets slightly spicier every day. I actually preferred the heat on day 3 than after only 24 hours of marinating. You can always add more wine and seltzer to balance out the heat. 


This sangria really looks beautiful when serving in a clear vessel. To keep cool outside of the fridge- I recommend freezing water in a medium square Tupperware and using one giant ice cube rather than lots of regular sized ice cubes. Small ice cubes dilute your cocktail much faster. 

Hope you enjoy these as much as my guests and I did!! Xo

Thursday, January 15, 2015

What's happening?!?

I have been completely out of sorts this past, gulp...month. I cannot believe it's been that long since I've blogged but it has and I'm obviously all to blame.

This is what is happening in my life- I have left my nanny position to return to running my seasonal restaurant, I have packed up my entire life (semi-dramatic but ask the curbside check guys at JFK) and headed back to the pacific coast of Costa Rica and now I am in the process of reopening my restaurant and beginning what I hope to be an amazing new chapter of my life. 

So I want to take this time to apologize to my people- the blog is paused while I get my life and restaurant in order. And if you know the Pura Vida lifestyle- you know it's not always the fastest route getting there. 

In the meanwhile I leave you with these amazing photos of my hometown of Playa Grande and if anyone needs a Costa Rican tour guide- I'm your lady!! Pura vida all! Thanks so much for your patience and support! 


Sunset over Playa Grande 


Gallo Pinto is the typical breakfast here- and my favorite!! 


Frangipani flowers line my path to the beach and the smell is intoxicating!! 


Howler monkeys lounge on the wires


Baby steps to opening my restaurant but at least the awesome mason jar lights are up! 


We don't deal with I-95 traffic but we do have to wait for the cows to pass by. 


The gorgeous and (almost always) empty beach I live on!  Grateful doesn't even begin to describe it! 

Back to blogging soon! Xo

Monday, December 15, 2014

Tomato and Herb Baked Eggs

I've been doing a lot of recipe testing for the opening of my restaurant in a month. Costa Rica here I come! And I love the ease, healthiness and lightness of this dish. It's a great make-ahead brunch item and it tastes delicious!! I highly recommend adding this to your holiday brunch menu! 


Tomato and Herb Baked Eggs 

Fridge:
6 eggs 
1 1/4 cups red pepper, diced (1 large pepper) 
1 tsp thyme, minced 
1/2 tsp rosemary, minced 
6 tbs ricotta cheese
6 tsp parmesan cheese, grated
3 tsp chives, sliced (optional) 

Counter:
2 cloves garlic, minced 
3/4 cup yellow onion, diced 

Pantry: 
1 (14.5 oz) can diced tomatoes, drained slightly (or 1 1/2 cups fresh tomatoes diced) 
2 tbs tomato paste
1 cup tomato sauce 
2 tsp oregano
1 tsp paprika 
1/4 tsp salt 
2 tbs olive oil 
Few cracks of black pepper 

Tools:
Medium pot
Wooden spoon 
Measuring cups/spoons
Cutting board
Chopping knife
6 ramekins or medium casserole dish 
Ladle 

Heat the pot over medium heat and add the olive oil. Once oil is hot- add onions, red peppers and garlic. Sauté for a 5-6 minutes and then add the tomato paste. Cook for a minute and then add the tomato sauce, diced tomatoes, thyme, rosemary, oregano, paprika, and 1/2 tsp salt. Turn heat down to low and simmer the sauce for 15-20 minutes, allowing the sauce to reduce and thicken, while stirring occasionally.

At this point you can turn off the heat and allow the sauce to cool. You can refrigerate this sauce for up to 5 days (or freeze it for a month).

Or remove from the heat and allow to cool slightly. Preheat your oven to 350 at this point. 

Using your ladle- pour about 1/2 cup of sauce into each ramekin or pour the entire pot of sauce into the casserole dish. 

Add 1 tbs of ricotta to where you plan to crack the egg. In the casserole dish- separate the dollops of ricotta every 3-4 inches. Crack one egg on top of each ricotta dollop and then sprinkle each egg with 1 tsp of grated parmesan and finish with 1/2 tsp of chives on top. Top with a little bit of freshly grated black pepper. 

Bake the ramekins or casserole dish for 12-15 minutes or until the whites of the eggs begin to set and turn white. If you want firmer eggs bake for another 5 minutes or broil for a minute. 

Remove from the oven and allow to cool slightly for 5 minutes. The eggs will continue to cook- which is why you take them out earlier than prefered. 

Enjoy this with a side salad or like I did with homefries, avocado and bacon. This is so good and so easy!! Perfect brunch meal!! Enjoy! Xo


Friday, December 12, 2014

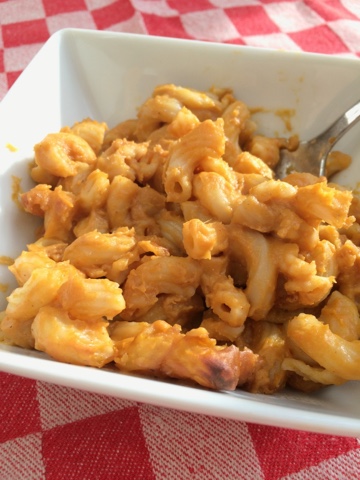
Butternut Squash Mac n Cheese

My friend Elizabeth has been harassing me (love you Beth!) about my butternut squash mac n cheese that I made her and her kids last year. Unfortunately it was one of the recipes I had thrown together and not paid attention to. So today I decided to pay attention while remaking this dish. It's an easy dish and packs in the vegetables and the kids love it! 


Butternut Squash Mac n Cheese 

Fridge:
48 oz butternut squash- peeled and cut small (the grocery store does this for you now- woohoo!!) or 5 1/2 cups pureed 
2 cups sharp cheddar, grated 
3/4 cup parmesan, grated 
1 cup whole milk 
1 tsp Dijon mustard 
1/2 tbs butter (olive oil if you prefer) 

Counter:
1/2 cup yellow onion, minced
1 garlic clove, minced 
2 cups waterm
1/2 cup pasta water

Pantry:
3 cups elbow noodles, uncooked 
1 tsp salt plus extra for pasta water 
1/8 tsp ground nutmeg 
Few cracks of black pepper 
Canola oil spray 

Tools:
Large pot of boiling salted water
Measuring cups/spoons 
Chopping knife
Cutting board 
Wooden spoon 
Blender or food processor 
Large pot with lid 
Small sauté pan 
Colander 
Ladle 
Casserole dish 
Aluminum foil 

Add 2 cups of water, 1/2 tsp salt and the butternut squash to the pot with the lid.
Cover and steam the butternut squash over medium heat for 20 minutes or until the butternut squash is super tender when pierced with a fork. You essentially want butternut squash mush. 48 oz makes more than 5 1/2 cups but I usually set some aside for soup. 

Add pasta to the boiling salted water and cook for 5 minutes. You want the pasta undercooked so it's not soggy later. Drain the pasta, while reserving 1/2 cup of pasta water, and run the pasta under cold water to stop cooking. Set aside for later. 

Melt butter over medium heat in sauté pan. Add the onions and garlic and cook for 5-7 minutes or until onions have softened. Set aside. 

Once the butternut squash is steamed- don't drain. Most of the water should have evaporated after 20-25 minutes. Ladle 5 1/2 cups of the puree into the blender or processor. Add milk, reserved pasta water, ground numeg, 1/2 tsp salt, both cheeses, Dijon mustard, onion and garlic mixture and a few cracks of black pepper. Blend until smooth. 

Spray casserole dish and add the undercooked pasta. Pour the sauce over the pasta and mix well. Cover with aluminum foil and put in the oven. Bake for 25 minutes covered. Remove foil and bake for another 10-15 minutes uncovered. Remove from oven and cool for 15 minutes before serving. Enjoy it!! Xo